

Routing traffic to Gmail with FastAPI
Introduction
In a world where technology moves at the speed of light, FastAPI is the newest package that provides developers with a quick setup, fast-network solution for controlling backend APIs. Its power and ease of use make this framework a top choice for web servers today. Coming loaded with a standard package of network controls, FastAPI provides pythonic methods for everything from routes and automatic model serialization to swagger generation.
In this tutorial, we will walk through a simple example of routing traffic through a backend web server to Gmail for managing users’ messages. We will go over basic features of FastAPI such as routes, dependency injection, and the underlying Pydantic library. By the end, you will be ready to connect your local web server to the Google API or any other public web interface.
What is FastAPI and Why Use It for Routing?
FastAPI has quickly become the go-to library for creating web servers in Python. It offers a full package of network tools including simple to use router annotations, CORS Middleware, serialization, automated swagger docs, etc. Under the hood, FastAPI leverages both Pydantic and Uvicorn to host endpoints and serialize objects at speeds that are considerably faster than Flask and Django, older options for web hosting. Don’t believe it? Check out TechEmpower.com for benchmarking Python server technologies.
According to data from Pycharm, a JetBrains IDE, FastAPI is officially the most downloaded Python web server as of August 2025 growing from 29% to 38% usage in the last year with over 4M+ downloads a day.
Given these numbers, FastAPI proves itself to be the optimal choice for serving backend data connections in Python. So, without further ado, let’s start up a server and connect with Gmail.
Setting Up FastAPI
To get started let’s install the underlying dependencies in our Python environment.
“$ pip install pydantic uvicorn fastapi”
These 3 dependencies are all you need to spin up a local server and start hosting your API with automatic object serialization and even an autogenerated swagger doc as a freebie!
Now to create the server, open a new file in your Python directory and let’s call it fastapi-server.py. FastAPI works on the standard model where your “main” if-statement will start up a server which takes a FastAPI object loaded with all your custom configurations.
In the following code, we will use the uvicorn dependency that we installed as the core server and start it serving on localhost at port 8000.
This code doesn’t do much, but it will serve as the foundation for our entire application. For a local app we will run with reload=True in uvicorn, however it is important to note that production applications will not use this. Now let’s add some routers.
Defining Simple Routers and Pydantic Models
Working with FastAPI, we will use the primary app object that we have created and add all desired routes and configurations to it so that the uvicorn server can run it all in concert. For example, if we want to add a simple “health” endpoint to our server, we will create an APIRouter object defining a health endpoint and add it to our application.
In the above example, we built a “/health” endpoint onto the health_router specifying the http method as “GET”. This route simply responds with a dictionary that shows our status is “ok” a common practice in web servers. Note that Pydantic does all the work for serialization here:
We did not have to define any serializers to stream this response across the network. Our Pydantic library is connected out of the box to return a valid HTTP response from the endpoint regardless of what we send as a response.
Let’s expand on this concept by creating a new Gmail endpoint to read the number of messages a user has in their mailbox.
To simplify http calls to the Gmail API, we will use Google’s python libraries. Install the following dependencies in your python environment to get started:
“$ pip install google-auth google-auth-oauthlib google-api-python-client”
These libraries will help us configure OAuth 2.0 credentials and build a Gmail client. This configuration will require you go to the Google Developer portal and set up your app to obtain the client Id and client secret values. Walking through this process is a large topic, so I will cover it in another tutorial. For now, I will assume that you have the client credentials in a file name “credentials.json”.
Now let’s add a new gmail_router object with the path prefix=”/gmail”. Here we will host the path “/inbox” where we will serve our clients their email and message count. Then we will add our new endpoint to the app object by adding the gmail_router.
Eureka! We built it! We now have a simple API server that can provide a user with Gmail connectivity. From here, we can scale up our application to whatever limits we want. The libraries provided by Google contain a whole host of endpoints for communicating with Gmail which can be leveraged for all sorts of cool projects to manage or automate a user’s email.
Dependency Injection for Singletons
Now let’s talk about some of the technical configurations with FastAPI that abstracted away most of the normal REST or Python details.
Notice above that the read_inbox() method takes a service as a parameter which is the return value of the FastAPI Depends() method. Depends is a method from FastAPI that handles dependency injection. It requires its argument to be a pre-defined method which returns an object of matching type like we did on line 14 with get_gmail_service().
Dependency injection is important in asynchronous web hosting for multiple reasons including providing a Singleton pattern for creating objects like our Gmail service. Now Python does not enforce this pattern meaning that we could still find other ways to instantiate the service object. However, FastAPI has built in the Depends method to provide a framework that is easily repeatable.
These patterns also make it easier to follow the flow of data through your API since you can define the dependency structure throughout your project. Circular dependencies will cause runtime errors enforcing a vector pathway for object creation. This leads to better scalability in your applications by reducing the cognitive complexity as well as making for cleaner writing. Dependency injection and singletons should always be sought for the default in production ready asynchronous APIs.
Handling Origin Security with CORS Middleware
Before we move on, let’s briefly mention CORS Middleware and some security concepts. Typically, browsers limit cross-origin requests meaning that if a frontend webpage is hosted at one location and requests data from another, the browser will discontinue the request. This is called the “Single Origin Policy” which enables the browser to halt potentially malicious attacks against your server, an attack known as Cross-site scripting (XSS). Since this is a default for browsers, we need a mechanism to allow Cross Origin Resource Sharing (CORS). Browsers that enforce SOP will add “Origin” to the headers in a preflight check when requesting resources from a separate domain and expect that the server will respond with an allow list for the request. If this passes, the browser knows to move forward. This preflight and allow list are standard browser-server communication so let’s add one more snippet of code to our Fast API server:
Here we have added a middleware attribute to our app object. Our server can now work together with a browser to list domains that we expect to request our data. This would be helpful if your browser loaded a dashboard hosted at “localhost:8000” for example and your app was hosted in the cloud at “somewhere.net”.
Note that this does not directly secure your server nor does it prevent users from calling your API. That would require actual authentication mechanisms. This only works in conjunction with a properly configured browser.
Feel free to read more on this topic here https://developer.mozilla.org/en-US/docs/Web/HTTP/Guides/CORS?fbclid=IwY2xjawNjuv1leHRuA2FlbQIxMABicmlkETEzUDM1OERldmh1MXA4OVB5AR7Hedmb26pKh_7PXGSs4xd_IC_gotYATY6hC1RzingE7c4yqaPw_3BFNt8Xpg_aem_XdAGPENZLPokDEt7BCpUWQ
.
.
And that’s it! With the configurations done, let’s check out the automatically generated swagger docs.
Automatic Swagger Documentation
After you have finished creating your API service, it is always important to document it so that others know how to use it, and FastAPI has also provided us with these docs out of the box. Run your server application and point your browser to http://localhost:8000/docs
This route will take you to your Swagger doc generated based on the routes created on your app object. You should see something like this:
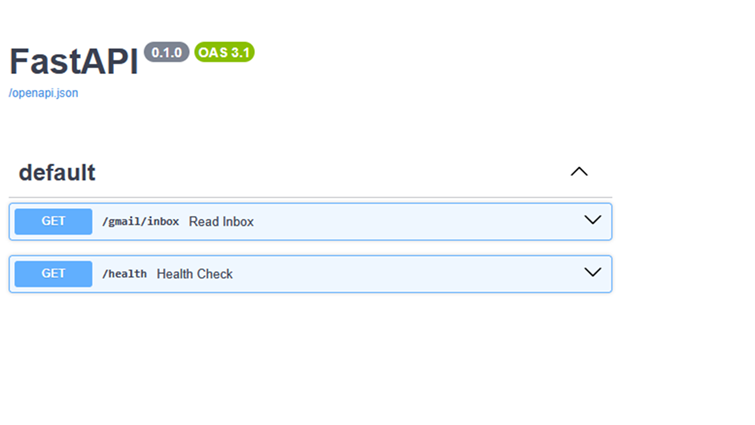
This Swagger page will automatically update with your service as you build more endpoints, add parameters or even add in configurations to the FastAPI object, app.
Conclusion + Next Steps
After following along with this simple FastAPI tutorial, you have created a simple API server app that can host a user’s Gmail account. We covered top configurations in FastAPI like routers and models, Dependency Injection and Singletons, CORS and even Swagger docs. With these basics, you are ready to automate email processing or even connect to other APIs like Meta or Reddit.
In a future post, I will cover more in depth the setup for a Gmail application since the dashboard can be daunting, but in the meantime, reach out to me using the links below to let me know what you thought and thanks for reading TechNoise!
()(o o)()
References and Further Reading
FastAPI docs - https://fastapi.tiangolo.com/
FastAPI Twitter (X) - https://x.com/fastapi
Google Developer Console - https://console.cloud.google.com/cloud-resource-manager
Google Gmail API - https://developers.google.com/workspace/gmail/api/guides
Gmail Python Quickstart - https://developers.google.com/workspace/gmail/api/quickstart/python
Gmail API definitions (userProfile) - https://developers.google.com/workspace/gmail/api/reference/rest/v1/users/getProfile
TechEmpower Benchmarking - https://www.techempower.com/benchmarks/#section=data-r23&test=query
Cross Origin Resource Sharing from Mozilla - https://developer.mozilla.org/en-US/docs/Web/HTTP/Guides/CORS?fbclid=IwY2xjawNjuv1leHRuA2FlbQIxMABicmlkETEzUDM1OERldmh1MXA4OVB5AR7Hedmb26pKh_7PXGSs4xd_IC_gotYATY6hC1RzingE7c4yqaPw_3BFNt8Xpg_aem_XdAGPENZLPokDEt7BCpUWQ
Simple Mail Bot by TechNoise - https://github.com/ladoyle/simple-mail-bot